Career Objective: To achieve a respectable position in the power electronics field, through utilizing the academic and the professional skills. To attain this I would like to work in a innovative and participative working environment.
Educational Qualification:
B.Sc. in Electronics from Bharatiyar University
Grade:
Project Grade:
Post Diploma in Power Electronics from NTTF Training Institute.
Grade:
Project Grade:
Professional Experiences:
Currently working for American Power Conversion (APC) – A Schneider Electric Company Pvt. Ltd.
Tenure 1: October 2011 to December 2011
Main Project: “Charger current too low failure in Tomcat model”
Target of the Project: To ensure the failure of the TOMCAT reduced to 11% from current rate of 40%.
My role: Test Engineer in Plant 5
Major Role: To monitor the failures in the PCB level testing and to provide suitable actions
Tenure 2: May 2012 to July 2012
Main Project: “Automation of In-circuit Test program up-gradation”
Target of the Project: To ensure that each of the test system has the latest program and tester
My role: Senior Test Engineer in Plant 5
Main Project: “Programming failure reduction in Cheetha Model ”
Target of the Project: To ensure that not a single non-programmed board should go to UPS build line after conformal coating.
My role: Senior Test Engineer in Plant 5
Duration: October 2011 to December 2011
Name of the Company: APC
Designation: Test Engineer
C.E.1 : This project covers the period October, 2011 to Dececember,2011. I handled this project at American Power Conversion (APC) (where I am working)-A Schneider Electric Company (I) Pvt.Ltd,IDF5,#187/3¼/3 Jigani,Bangalore-562106,Karnataka,India.
My designation during this project was Test Engineer.
The project was – ” Charger Current Too low Failure in Tomcat model”
C.E.1.1 : The nature of the engineering project was to ensure that the failure target of TOMCAT ( UPS System) was kept at 11% as against the existing failure rate of 40%. The features of the TOMCAT ups system are:
C.E.1.2: The objective of the project was to ensure and keep the failure target of TOMCAT at 11% as against an existing failure rate of 40%. The other objective was to bring out much efficient performance of the product through minimizing the TOMCAT failure.
C.E.1.3: The nature of my particular work area was to closely monitor all the failures in the PCB level testing and provide corrective action. As a team member of DPU reduction team, I collected all failure rates related to this product in PCB functional test.
C.E.1.4: ORGANIZATION CHART
C.E.1.5: My duties and responsibilities are as follows:
C.E.1.5A: As a member of test engineering team, I am responsible to take care of test relates equipment like In Circuit Testers (i.e Teradyne ICT machines), PCB Functional test jigs and test fixtures for UPS Testing.
C.E.1.5B: Responsible to ensure safety measures in work place and supporting to health and safety department to implement safety feature in testing area. Identifying risks and giving mitigation for identified risks.
C.E.1.5C: Schedule meeting in weekly basis with my team to discuss OEE (Overall Equipment efficiency), and FTY (First through Yield) and plan tasks for forthcoming week.
C.E.1.5D: Responsible to Implement test specifications in ATE using Lab View / C, C++ software.
C.E.1.5E: Constructs prototype of new test equipment and work with construction test team to debug of high volume production test hardware and software.
C.E.1.5F: Modifies existing test hardware and software to support new products and validate new designed test jigs.
C.E.1.5G: Conduct training session to test group on new test setup and preparing work instruction to operate.
C.E.1.5H: Assists design engineers in the development of hardware and software to meet detailed test specifications and works with design engineering to correct design related problems.
C.E.1.5I: Drafts and reviews test engineering documentation to ensure accuracy.
C.E.1.5J: Completes all fixture release procedures, including documentation, checklist, and specifications.
C.E.1.5K: Test and evaluate new and alternate sourcing of instruments and spare parts.
C.E.1.5 L: To conduct safety training and awareness to test jig users periodically.
C.E.1.5 M: Ensure all preventive maintenance and checks for instrument calibration dues.
C.E.1.6: PERSONAL WORKPLACE ACTIVITY
C.E.1.6A: How you applied your engineering knowledge & skills:
The test process that was followed was to do the ICT test then programming and then send the board for conformal coating. After doing the conformal coating the boards will be send to the final build line for assembling to ups. The assembled ups will be undergoing final test if the RTC board is not programmed it will fail in the start up. We were not doing any verification for the board whether it is programmed correctly and there is no Quasar entry for this board (Quasar is database for checking the pass or fail of board with the board serial number). Operator in a tracking sheet tracked this where some time the operator fails to update and it was human depended. As per the procedure is concern, there is a switch that the operator needs to select in the RTC board for doing programming. Sometimes if the operator forgets to select the switch in the right-position and it will program wrongly.
To overcome this failure I have made an automated test setup to perform the programming verification before sending to the conformal coating. I have designed a BON (bed of nails) which can be interfaced with Functional tester. The bon consist of a controller unit which is used in the UPS .In the ups the Rtc board will be connected to a main controller. As per the main controller instruction, it is performing the function. My idea is to simulate the same this by powering up the controller .The controller will be interfaced with a computer that is loaded lab view program. The communication with the controller and the computer will be mode bus communication. Through mode bus communication, the computer is checking the hex data present in the address lines whether it is programmed or not.
For the following test steps of functional test it is necessary to put the RTC1 PCBA under full operation, this means that serial communication with Application PCBA µC via CMX1 PCBA has to be established to read out values of RTC1 PCBA and to check all functionality of PVO1 µC.
For that reason, it is necessary to connect the RTC1 PCBA via S400 connector and via a CMX1 PCBA to an AIC electronic control block (application – , display – , terminal – , HHP_I1 – and HHP_MC1 – PCBA). In addition, test equipment (e.g. a LABVIEW tester) with modbus communication function (or PC with “MBU-PARAM” software tool) has to be connected to the electronic control block to exchange data with RTC1 µC via application PCBA software interface.
Application PCBA:
1 (XCAPP_iX1.1IE06#1.mot)
HHP_MC1 PCBA:
(XCLC1_iX1.1IE02#9.run)
RTC1: (device under test): (XCRTC1_X1.1IE02#1.hex)
This step is only necessary, to check at beginning whether the content of the EEPROM and software version of AIC controlblock (parts of fixture) are O.K.
First power up to build up the configuration for modbus communication
-Apply +24V ±0,2V DC at HHP_I1 PCBA from P24M1 (X4-2,4,9) to 0VM (X4-1,3,8)
-Apply +5V ±0,1V DC at HHP_MC1 PCBA from P5F (X1-18,24,38) to 0VF (X1-20,32,36)
-Apply +15V ±0,1V DC at HHP_MC1 PCBA from P7F (X1-12) to 0VF (X1-20,32,36)
Next is modbus diaog setup by start the labview modbus communication tool. modbus address “248” since this value is always accepted.
-Read object MODE until this object become “OK”; timeout = 1min
-Write 0x0002 to object PARA to enable parameter access via modbus
– Write 0x23FF to object SVCD to enable RTC1 test parameters
-Wait 5sec. after Modbus communication has been established
– Read object RTST to verify if RS422 connection between application and RTC1 PCBA is working; timeout = 10s.The response should be 0x0001
-Read RTC1 software version
-Check self test Results
Read object RTER to verify if selftest results after power up are O.K.; timeout = 10s
The response should be 0x0001
Read RTC1 software version
Read object RTST to verify if RS422 connection between application and RTC1 PCBA is working; timeout = 10s
Power off
Switch OFF all power supplies from above “Power ON” test step (24V, 5V, 15V)
After this the test is completed the serial number of the board will be send to Quasar
Any particular difficulties/problems you encountered and how you solved them
First I have planned a manual test setup to verifying the RTC boards .With a pc and jig verify the board and then send the serial number manually to the Quasar (serial number tracking database). Then I found that it is not a full proof system and there is a chance of operator to skip the test. The I discussed with the lab view engineer to develop a lab view program .After confirmation I have made BON which can be interface with the fixture then with the help of lab view program the quasar entry will be automated and the problem is solved.
My view of the overall project is that all the objectives of the project were met i.e. Programming failure reduction in Cheetha Model.
The project met is its goal i.e. (a)After impimenthin the programming verification test I have noticed zero failure in the ups build line (b) No board are moving to scrap because the failure able to monitor before conformal coating itself (c) saving the cost of 37872$ per annum.
I was fully involved in the project and I have received appreciation certificate from management for cost saving of USD 37872 per annum. I was able to apply my knowledge and work skills to deliver the requirements of the project. I was able to apply design techniques, and function independently and as a team.
Essay Writing Service Features
Our Experience
No matter how complex your assignment is, we can find the right professional for your specific task. Contact Essay is an essay writing company that hires only the smartest minds to help you with your projects. Our expertise allows us to provide students with high-quality academic writing, editing & proofreading services.
Free Features
Free revision policy
$10Free bibliography & reference
$8Free title page
$8Free formatting
$8How Our Essay Writing Service Works
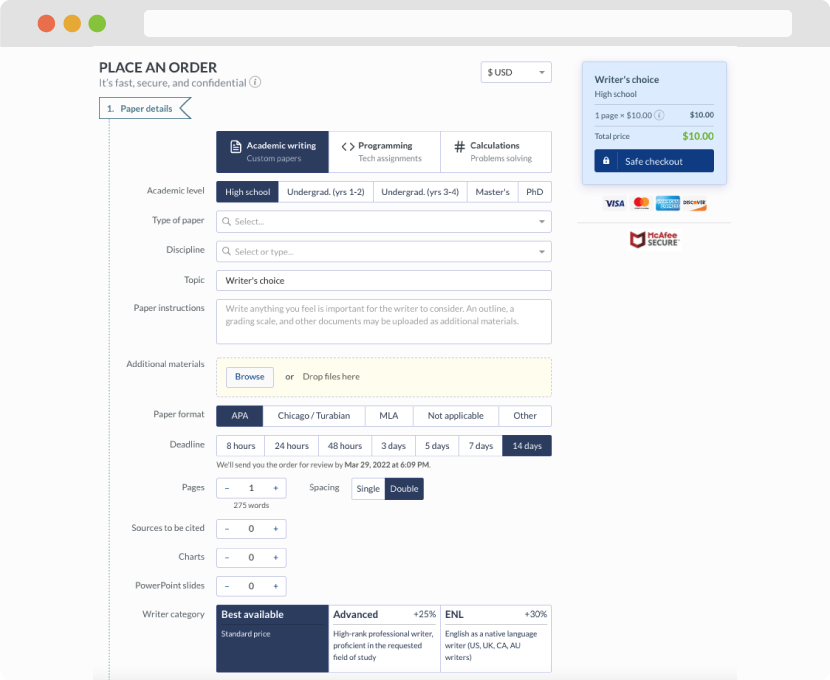
First, you will need to complete an order form. It's not difficult but, in case there is anything you find not to be clear, you may always call us so that we can guide you through it. On the order form, you will need to include some basic information concerning your order: subject, topic, number of pages, etc. We also encourage our clients to upload any relevant information or sources that will help.
Complete the order form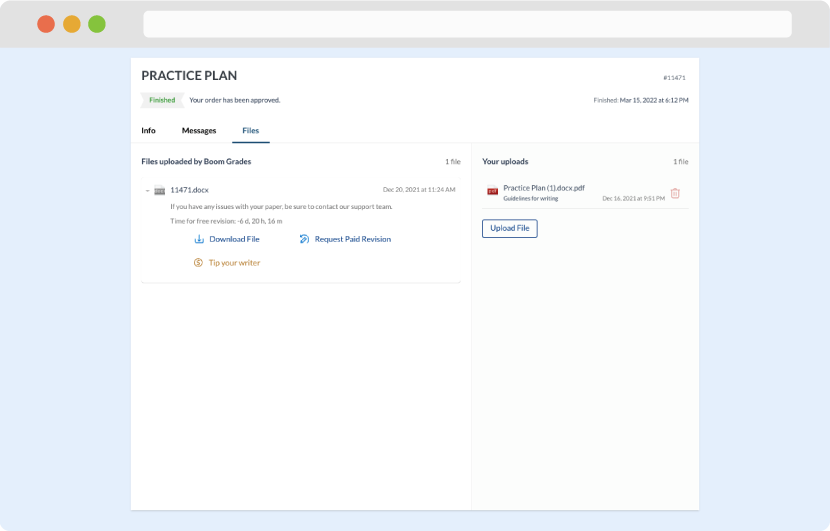
Once we have all the information and instructions that we need, we select the most suitable writer for your assignment. While everything seems to be clear, the writer, who has complete knowledge of the subject, may need clarification from you. It is at that point that you would receive a call or email from us.
Writer’s assignment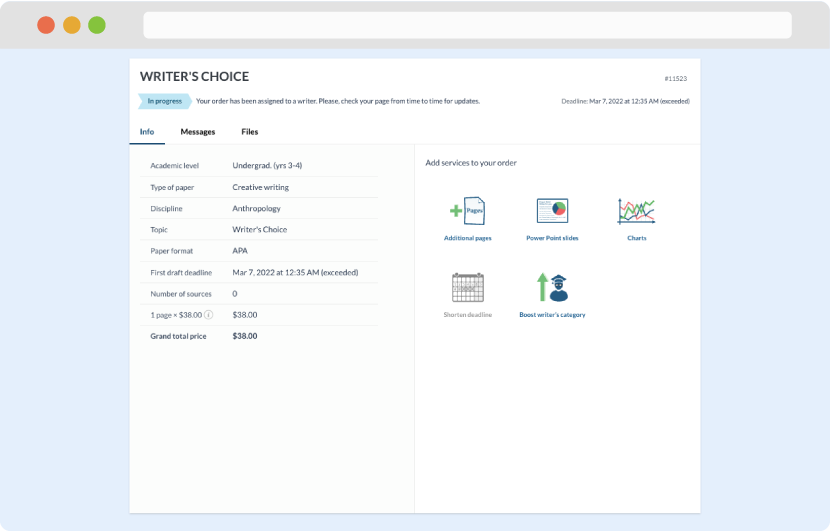
As soon as the writer has finished, it will be delivered both to the website and to your email address so that you will not miss it. If your deadline is close at hand, we will place a call to you to make sure that you receive the paper on time.
Completing the order and download